


PFsense – Firewall
PF sense vs the black box that your ISP gives you.
I’m sure some of you have a sense of what pf Sense is, and some of you may not. For me, pf Sense is my home defense: a layered approach to network security and a foundation I can build on for hands-on projects.
Who has you smiling like that?

What moment led me to build my own firewall and stop trusting the “black box” my ISP gave me? This goes back to 2024, when I was attending Arizona State University’s Cybersecurity Boot Camp. We were at the tail end of a long, arduous six months—classes, projects, readings, studying, every-day-6-10, every lecture an insight to how much I don’t know—
“…the depth of my mind does in fact have bounds…”
We covered everything from basic Linux commands like
ls -lah
…to setting up Splunk and analyzing trends in network traffic…

I’ve always been interested in breaking into things, but I wanted to really understand how firewalls and security mechanisms work. With knowledge comes power… or whatever that DC superhero said. So I chose to build a pfSense-based home security setup as my final project; Onion Armor.

That project gave me my first taste of what pfSense can really do. Now I’m here to rebuild it. Better. Cleaner. More powerful.
What I set out to do
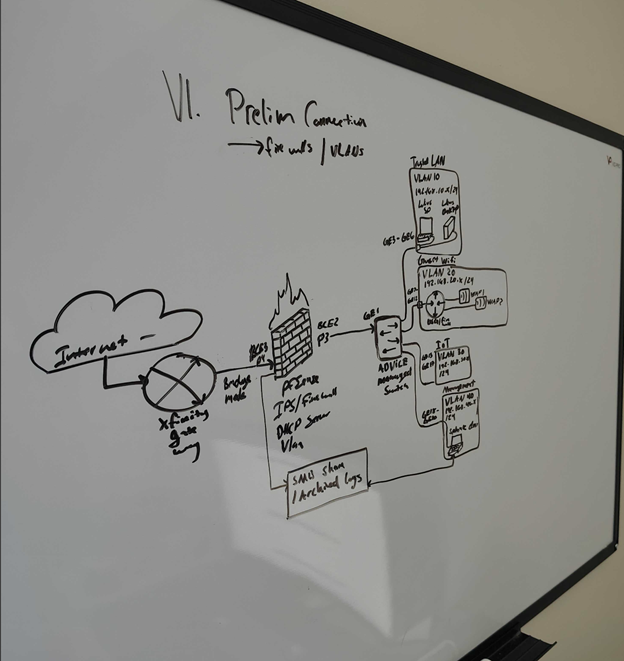
The overall goal? Build a network infrastructure that includes:
- A firewall
- DHCP server
- DNS forwarder
- Reverse proxy
- VPN
- IPS
- Network segmentation
- VLANs
- Centralized logging to a Splunk server for traffic analysis
Woah, woah, woah—pull it back. How on earth does someone just build all of these systems and make them work together?
That’s the journey I’m documenting.
Why PFsense?
I wanted a tool that let me do all of that and more through an intuitive interface. So what is pfSense?
Here’s the official line:
“pfSense is a free, open-source, web-based firewall and router software distribution based on FreeBSD, used for network security and routing. It offers features like VPN, traffic shaping, and more.”
But to me?
It’s free, open-source, web-based firewall and router software…
It’s a full-featured firewall platform that makes a hands on home lab set up enjoyable, instructive, and most importantly functional.
Enough glazing pf Sense—let’s talk production
The Hardware
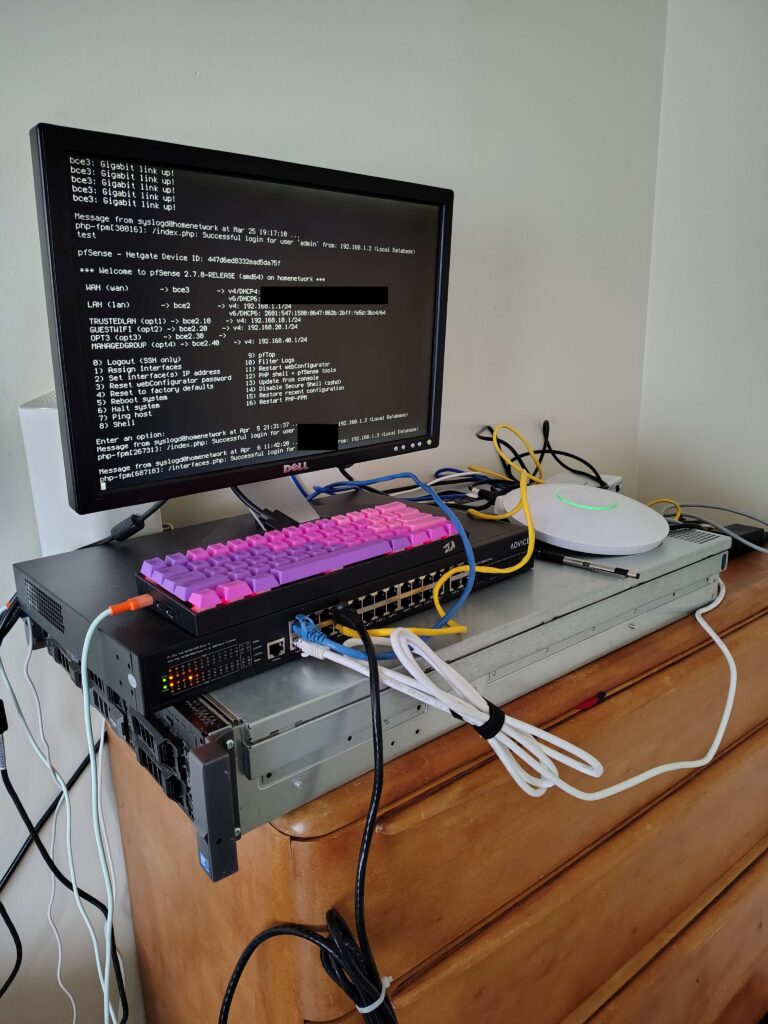
I somehow acquired the old on-prem Exchange server from one of my last few jobs. Not going to say who, but thanks BC.
The reason I used this isn’t because of the high-speed fans that sound like a 747 on takeoff, or because it’s a full-length 2U anvil, and definitely not because it has a RAID system with two identical drives inside (that I’m not using). No, it was because of two very specific reasons:
- It had a NIC card with 4 Ethernet ports (3 that worked)
- It had 4 front-removable hard drive slots
It’s loud. It’s overqualified. And it’s my first line of defense in my home network.
How I set up PFsense on the ol’ gal
I’ve got a few dozen USB drives lying around that I usually use for Windows, Ubuntu, and Kali Linux installs. I had to sacrifice one of my storage drives for the pfSense install.
If you’ve never flashed a USB with an ISO before, I’m here to tell you… you won’t find out how in this blog.
How to image an ISO
How to use Etcher to flash a USB drive
Once the bootable drive was ready, I plugged it into the server, booted from it, and started the install.
⚠️ NOTE: I’ll be going over a more detailed, step-by-step install guide in my upcoming pfSense IPS Project page [link placeholder]. Sign up below to be notified when it drops.
Init Configuration
After installing the OS, you’re met with the terminal config screen.
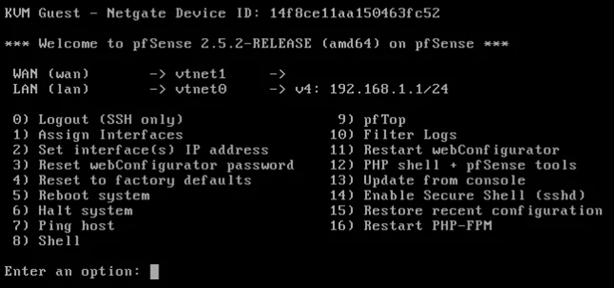
You must interact with this screen before using the Web UI. This is where you assign your network interfaces.
Take a look at Option 1: this is where you assign your LAN, WAN, and any other interfaces you plan to use.
What is WAN vs. LAN?
WAN is the interface assigned your public IP address. All communication with the outside world goes through this.
LAN is for your internal devices. pfSense (acting as the DHCP server) assigns internal IPs to your devices so they can talk to each other and reach the internet.
The gateway handles routing between public and private IPs.
For my physical setup:
- WAN = bce3 (port 4 on the NIC)
- LAN = bce2 (port 2)
You’ll be prompted to:
- Enable DHCP
- Set IP address range
- Define subnet
My interface setups
· WAN: DHCP = True → This allows my ISP to assign and reassign my public IP when needed (e.g., during a power outage).
· LAN: DHCP = False → pfSense acts as the DHCP server, not a client.
· Static IP on LAN: 192.168.1.1/24 → That gives me 253 usable IPs (which I will never fully use).
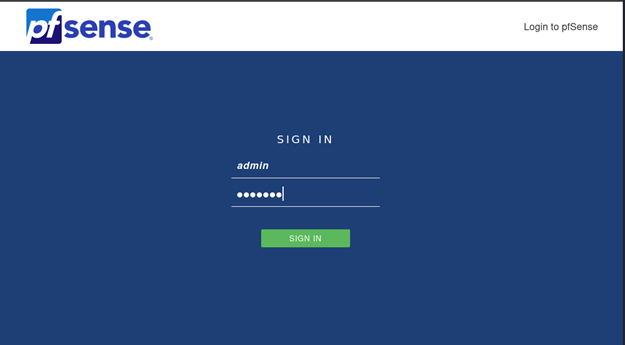
The Web UI
The beautiful UI of my pfSense firewall.
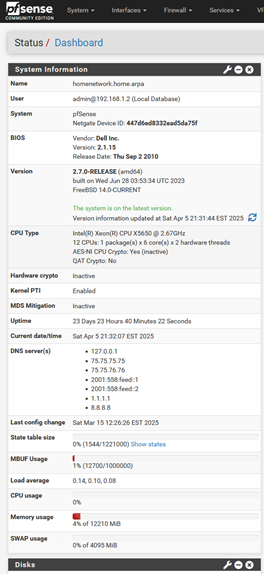
Yours might look a little different than mine; some of the info may vary—but this is where most of my work happens. For now, my goal is to set up DNS, DHCP, and some basic firewall rules. So let’s start at the General Setup.
Wait, what’s the username and password?!
https://letmegooglethat.com/?q=what+is+PFsense%27s+default+web+UI+usename+and+password
DNS
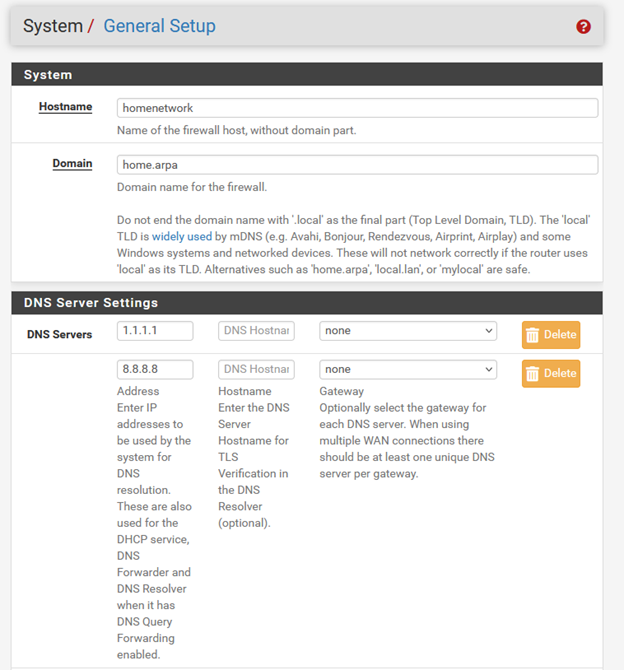
DNS
I’m using a DNS Forwarder because I don’t need a custom resolver. I trust Google and Cloudflare… right?
[Remember when Cloudflare pushed an update that caused millions of Windows machines to crash?]
What’s the Difference Between a DNS Resolver and a DNS Forwarder?
A DNS forwarder takes recursive queries from your clients (like your PC), then forwards them to an upstream DNS server (like Google or Cloudflare).
A DNS resolver also accepts recursive queries but resolves them itself, starting from the root DNS servers and working down to the authoritative source.
So:
Forwarder = “Go ask Google”
Resolver = “I’ll find out myself”
DHCP server – End point connection
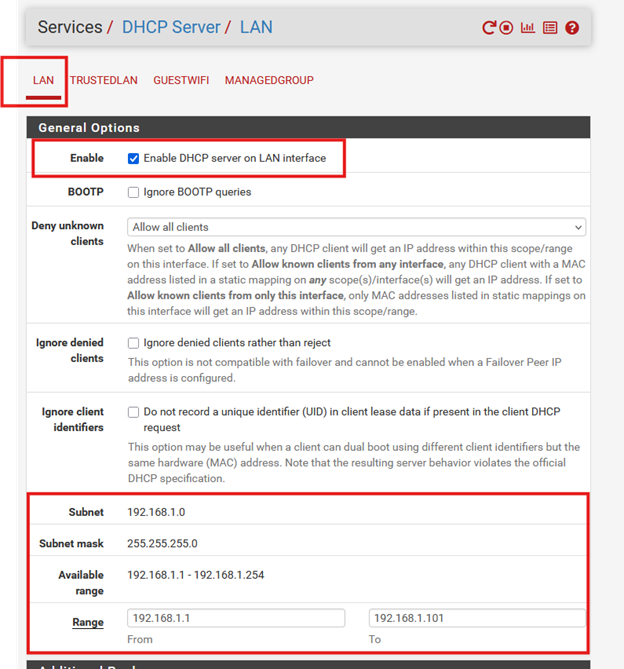
On my LAN interface, I’ve enabled the DHCP server, which means pfSense will assign IP addresses to devices that connect to it.
- Subnet: 192.168.1.0
- Subnet Mask: 255.255.255.0
- Available Range: 192.168.1.1 – 192.168.1.254
This gives me up to 253 devices on the LAN. Since I don’t need that many, I manually limited the DHCP pool to .1 – .101.
⚠️ NOTE: If you don’t see “TrustedLAN” and “GuestWIFI” in your interface list, that’s because I’ve already configured VLANs.
PFsense -VLAN
After DHCP was enabled I plugged in my laptop to the interface and spammed
ipconfig /alluntil I saw my beautiful 192.168.1.3. I then pinged the DNS of google, and then went to google its self. A moment of triumph because now I can turn off my mobile hotspot.
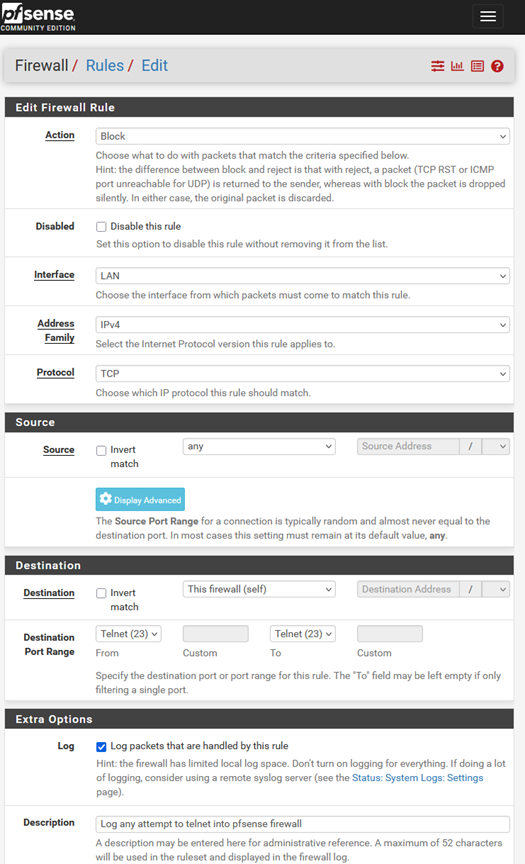
Lastly Firewall rules ( Basic )
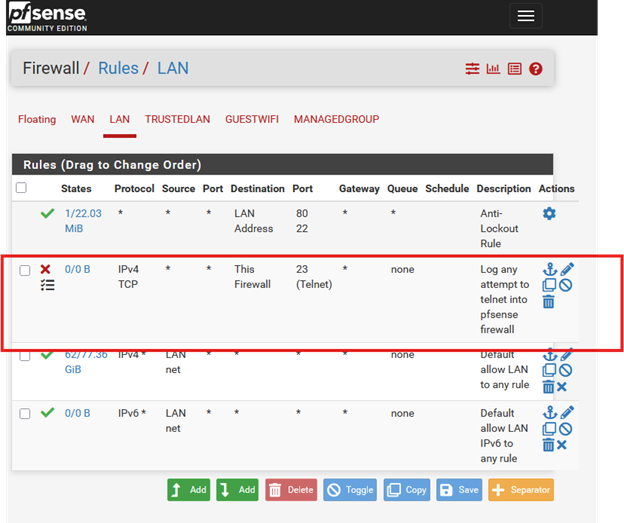
To keep it simple, I created a tangible firewall rule on the LAN interface that blocks all communication to port 23 (Telnet). which is unencrypted SSH. I set this up while troubleshooting my syslog server and kept the rule because –
“We don’t need anyone (including myself) telnetting around this network.”
Rule Logic:
- Interface: LAN
- Action: Block
- Source: any
- Destination: This firewall
- Port: 23
- Logging: ✅ Enabled
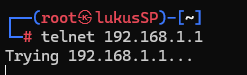
From my device I attempt to connect to the firewall using Telnet (which defaults to port 23)… and boom—we see logs of the blocked attempts, exactly as expected.

Firewall working. Logs generated. Rule validated.
Whats next?
We’ve covered:
- pfSense installation
- Interface configuration
- DHCP
- DNS
- Basic firewall rules
Next on deck:
- VLAN setup
- Managed switch configuration
- Ubiquiti WAP integration
- Log management (and Splunk, eventually)
I’ve got more coming—if you want updates, sign up below to subscribe!
Final thoughts ?
Take your time. Enjoy each step.
When I first installed pfSense and removed my ISP’s gateway, I had no internet connection. I reconfigured multiple times, read the documentation, and eventually got a public IP address assigned. Then it clicked…I could ping DNS from pfSense, and my devices started getting IPs. It was… magic.
So stay curious, stay persistent, and give yourself some grace. You’re building something real.
Here’s a link to the full project (it’s a work-in-progress, but I’m building it actively).
Leave a comment or ask a question—I’d love to help.
![Protected: HTB: Code – Guide [Spoilers] walk through](https://dotequal.com/wp-content/uploads/2025/04/HTB_Code_previewpicture-400x250.png)
Amazing work. keep rocking and wish you all the best !!!
Appreciate that! thank you